2014
Oh I cant wait to get the boat back in the water. First addition is a new carbon fiber 43" wheel. I know it won't make us faster or sail better but it sure does look nice. BUT the newly template faired keel should make a huge difference and I can't wait to play with that. Other projects include the addition of an additional water tank on the starboard side and a redesigned distribution center for the water maker and storage tank selection.

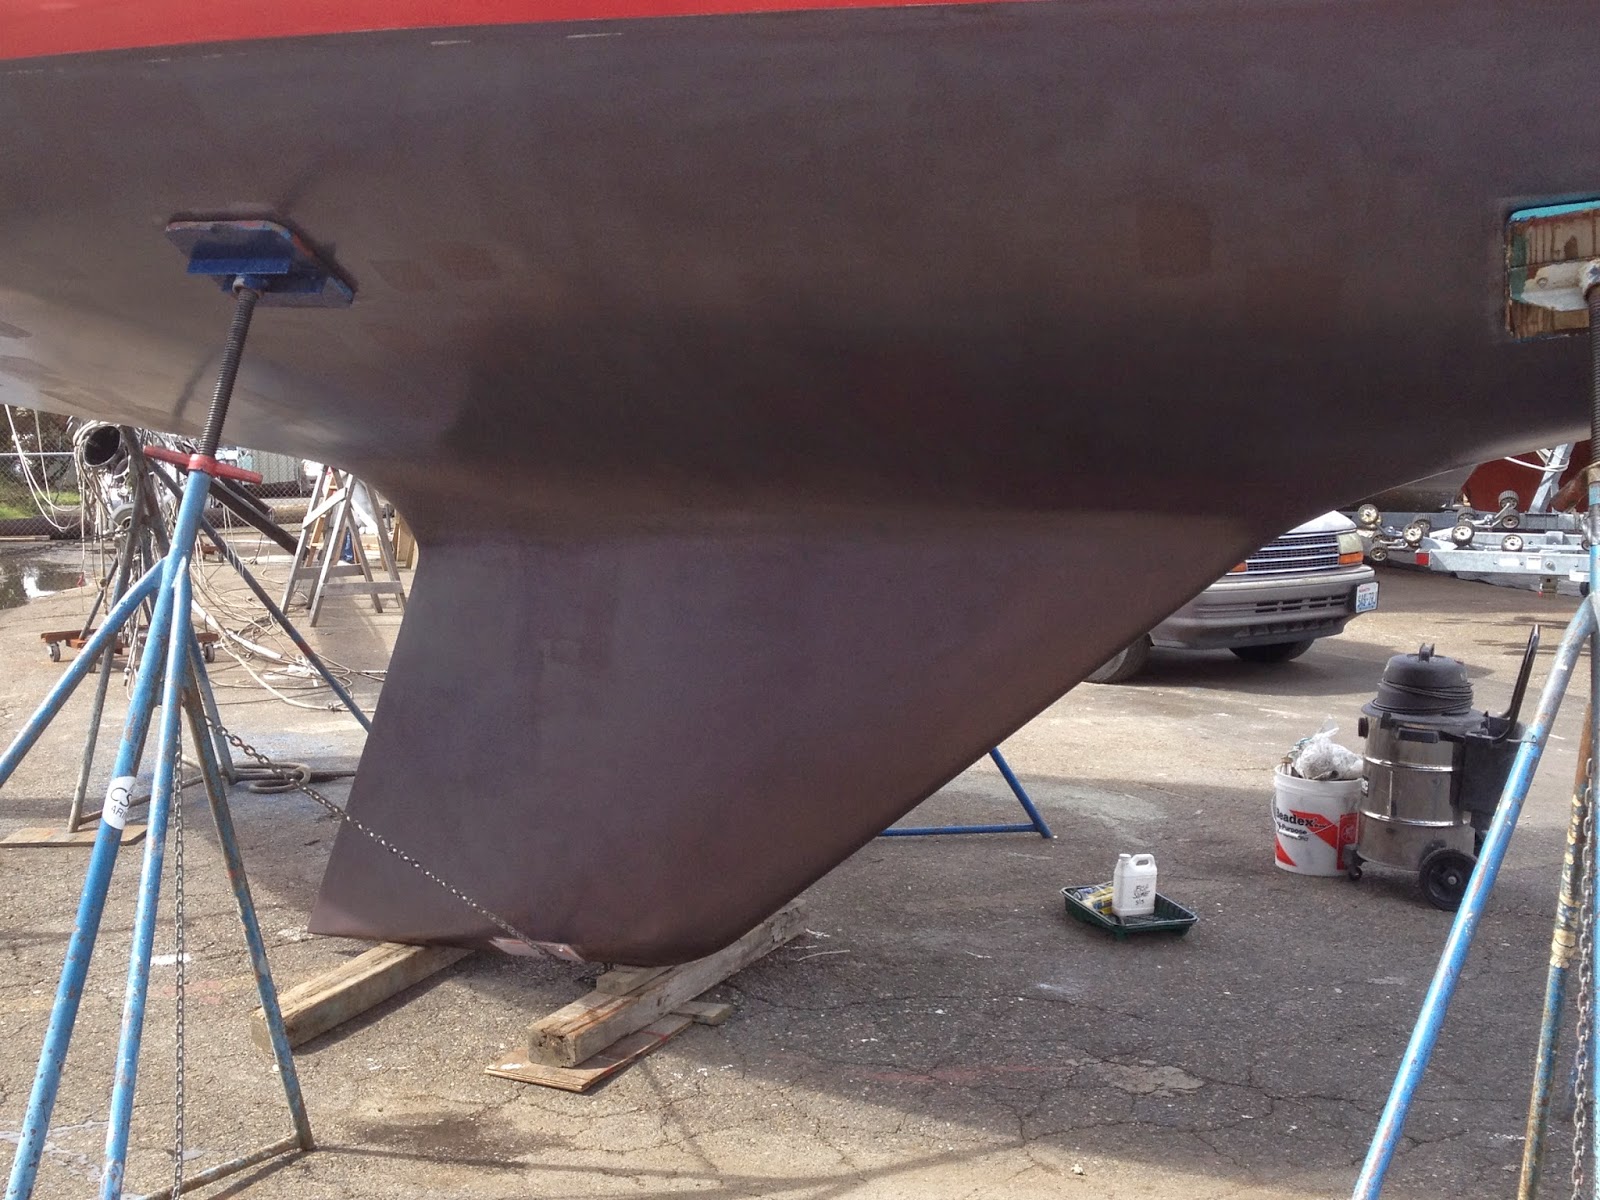
Before the fairing, notice the pregnant guppy bulge in the center of the keel

And afterwards a beautifully shaped foil, just like the designer planned. After the removal of 1/4 inch of lead down the center of each side Peregrine is 300 pounds lighter and now should be able to point like her polars say she should.


Sometimes its just because

This water distribution center is located in the aft end of the bilge. It allows easy access for the port and starboard storage tanks as well as control of where the watermaker outputs. Also shown is the new port water tank which holds 18 gallons and matches the starboard side tank.

October 2012
 Deck layout redesign
 Over the last month I have removed all of the deck hardware, filled the holes and will soon begin laying the hardware out in a more intuitive and efficient layout. The main problem that is being addressed is removing halyard winches from the mast and mounting them on the deck about mid-cabin. Included in the projects are upgraded lines and hardware, new Dynema life lines and few organizational tweaks. In a nutshell when finished we will have the Main Sheet terminated on both sides of the companion way to winches, the spin and jib halyards led to winches on both sides of the cabin top. So far the project has netted a weight reduction of over 120 pounds. The project is a balance between setting the boat up for racing with a crew, maintaining its original aesthetics and fixing the inability to trim the main when the dodger is up while cruising. Pictures to follow upon completion.


Engine Control Panel
Oh I cant wait to get the boat back in the water. First addition is a new carbon fiber 43" wheel. I know it won't make us faster or sail better but it sure does look nice. BUT the newly template faired keel should make a huge difference and I can't wait to play with that. Other projects include the addition of an additional water tank on the starboard side and a redesigned distribution center for the water maker and storage tank selection.
Before the fairing, notice the pregnant guppy bulge in the center of the keel
And afterwards a beautifully shaped foil, just like the designer planned. After the removal of 1/4 inch of lead down the center of each side Peregrine is 300 pounds lighter and now should be able to point like her polars say she should.
Sometimes its just because
This water distribution center is located in the aft end of the bilge. It allows easy access for the port and starboard storage tanks as well as control of where the watermaker outputs. Also shown is the new port water tank which holds 18 gallons and matches the starboard side tank.
October 2012
 Deck layout redesign
 Over the last month I have removed all of the deck hardware, filled the holes and will soon begin laying the hardware out in a more intuitive and efficient layout. The main problem that is being addressed is removing halyard winches from the mast and mounting them on the deck about mid-cabin. Included in the projects are upgraded lines and hardware, new Dynema life lines and few organizational tweaks. In a nutshell when finished we will have the Main Sheet terminated on both sides of the companion way to winches, the spin and jib halyards led to winches on both sides of the cabin top. So far the project has netted a weight reduction of over 120 pounds. The project is a balance between setting the boat up for racing with a crew, maintaining its original aesthetics and fixing the inability to trim the main when the dodger is up while cruising. Pictures to follow upon completion.

Engine Control Panel

 The control panel for the engine instruments had some issues with keeping water out. The original enclosure which should have been an enclosed box had at some point the rear portion cut off. This left only the frame in the cockpit with the pressboard panel board. The problem with that is that should that panel have ever become compromised then there would have been a 16"x8" hole in the boat that would allow water to flow from the cockpit directly into the engine compartment. So while replacing the box I also cut a new panel from acrylic and mounted the instruments, sealing them and the panel. This should keep the back of the instruments drier as well as closing up that large hole. During the 2011 Coastal Cup the night watch took a wave over the stern that filled the cockpit to a depth close to three feet, the control panel is located one foot above the sole. You can imagine the amount of water that would have flooded inside the boat had the panel been knocked out. Problem solved with a replacement box the way it was meant to be installed.
NMEA Update,
Allright everything is hooked up and everything works, the project went so much easier after taking the time to draw up a schematic of the connections as well as one of the bus bar. Now that it is all done and working just like it should I have decided to start all over...why? Well because I figured since I have my brain around it Ill configure it so that SSB just plugs into place in the future and I am adding the Nexus Race box to the configuration, something I wasnt aware of at the start of the project. Actually Peregrine is getting one of the first 25 units being shipped. The best thing about the Race Box is that it will allow us to display our polar boat speed directly under our true boat speed all the time and with out a PC being turned on. Way Cool!!! Pictures when finished probably in another month.
March 2012
Currently I am trying to configure and get all of the instruments to talk with each other, simple right NMEA 0183 input, output, NOT SO! I am trying to get the AIS information to two GPS units and the Nexus FDX server and then to the laptop. Im now at about day four or five and tomorrow will have two electronics expert installers on the boat. We may need to install a multiplexer to solve the problem. As is always the case the way it is hooked up now should work but it doesn't. When it does it will be sweet but until then the frustration meter keeps climbing for all involved. Will post an update when it is resolved.
Water Maker Installation


Well I realized with all the talk of the water maker that I never properly addressed the project on this blog. Last winter I removed the 24 gallon bow tank and supporting bulkheads to make room for the Spectra Ventura 150 water maker and to get the 200 pounds of weight represented by a full tank out of the bow. The unit was great to work with from an installation standpoint due to its modular design. The photo shows the shelf I built to cover and protect the installation as well as to maximize usable space underneath the vee berth. Out of view of the picture on the starboard side are the systems two pre filters and on the port side the pressure pump and charcoal filter. The water maker is suspended upside down from an aluminium shelf underneath the cover in the photo. The pressure relief valve is accessible from the small door under the vee berth. The MPC controller is mounted at the navigation station and the unit has a nice automatic flush cycle allowing me to leave the unit powered and it will flush the membrane every five days alleviating the need to pickle the system for storage (easier on the membrane in the long run).
.Water Tank Installation
 .
. The water tank I installed on the starboard side holds 18-20 gallons and I moved the air vent to inside the boat, inside the hanging locker. This was done to eliminate the potential contamination of the fresh water from saltwater entering the old stanchion vent. The installation was pretty straight forward from what you see in the picture, the tank was located and then the framing around it was screwed into bulkheads and glassed to the hull, it is very stout and I do not envy any future owners who might decide to remove it. tucked away behind the forward drawers on in the vee berth on the starboard side is a three way valve directing product water to port, starboard and a third route to a hose so that water can be pulled before entering either tank or for servicing the unit. This year or maybe next I plan to install another tank in the same location on the port side. At that time I'll fabricate a valve similar to one pictured for the product water in able to draw off of the port or starboard tank and I am thinking I will install it in the aft area of the bilge. So far this winter I have been working on the water maker, a new bilge sump, through hulls and chain plates. The first one completed was the water maker. After taking it apart and replacing the membrane it seems the failure may have been due to oil in the membrane or marine growth. While going down the coast last summer we passed through three areas that are known to locals for their natural occurring oil seeps on the ocean floor. It may have also been my failure to properly pickle the unit for the three weeks the boat sat in Long Beach prior to the start of Transpac. We will never know for sure which one it was but it seems more likely that it was the oil as the unit was acting up prior to our arrival in Long Beach. Now it is working fine and was checked out by the factory.
Through Hulls and Plumbing
.
I had five through hulls glassed over and two of them relocated and installed in their place the FlowSpar Flowtech flush closing units. These are pretty slick in that when closed a plunger closes flush with the hull....no more hole on the bottom of the boat. Forward of the keel there are two flush closing through hulls and well aft of the keel two old school flush through hulls. I am happy with our bottom she is as fast as she is going to get.

Bilge Sump Tank.
.

 One of the annoying problems in the design of the boat was the shower sump, it would fill with water and grey water and when on starboard the bilge pump would not completely drain the sump leaving that Gray water sloshing all over your foulies. The bilge sump is 4 gallons and is connected to both the head sink and shower sump and now pumps out through the head discharge rather than a dedicated through hull.
.
Chain Plate Tie Down
.
 Besides removing all of the chain plates and resealing all of the windows I had the forward lower port chain plate reinforced from below by adding wire and a turnbuckle glassed into the hull. Before when the rig was tensioned the deck would bulge at the chain plate by at least a half an inch, no more! great fix and probably the way it should have come from the factory. Since the head was torn up for these modifications I also took the time to relocate the faucet and added a divider behind the sink to make that space more usable, a couple of teak cabinet doors and the project is complete.
.
Bottom and Keel

 Now that Transpac is done and I'm not worried if Team Hassle knows what my bottom looks like Ill post a few pictures. Peregrine was in the yard for five weeks and got a new spinnaker car and track (Harken captive ball bearings), new stripes and an amazing bottom. We sanded to barrier coat fixed some blisters and a nasty crack we found down the center line just forward of the keel which ran about 3 feet and was up to an inch deep in places. We then sprayed five coats of Balto Plate and burnished it to a mirror finish. If you look closely at the pictures you can see the reflections. In addition to the bottom work over the last two years we have been fairing the keel. As she came it was far from fair with some rather significant differences from one side to the other. After several pounds of filler and lots and lots of sanding we now have to learn how to trim the boat to point to the keels full potential.
We also installed our new rudder which was designed by Phil's Foils. It has a higher aspect ratio, is about six inches deeper and 75 pounds lighter than the old rudder. The performance both down and upwind was quite noticeable the first time we took her out, we actually had downwind control.
Exhaust Riser Replacement (Again)
After repairing it in 2010 with plumbing fittings it only lasted about 18 months. This time I drew up a new riser and had it fabricated at work out of stainless along with a stainless steel flange. Everything is welded and the smoother turns really improved engine performance and the sump hose noticably reduced vibration.

Instrument Housing


Finally after repairing the the hatch slides and installing a new grab rail in the cabin on the centerline I was able to complete the instrument installation. New Nexus instruments and the housing over the companion way. All of the wiring for the instruments was hidden under neath the teak trim or behind the bulkhead.
Radar Post
After two years and two repairs to the radar from sails wrecking havoc on the gimballed mast mount I decided it was time to move the unit. I moved it to a pole on the starboard side of the transom. I had the pole fabricated at work and added a tube inside for the fuel vent. It now vents about 9 feet above the water line, again after two years and two issues from water in the fuel tank it was time to correct this problem too. The old vent was located on the transom and in following seas and rough weather water would work its way up the vent and into the fuel tank. I also mounted the stern running light at 10 feet above the water line and made provisions to have the MOB pole mounted as well. In addition I added a weather satellite receiver for my chart plotter.


Winter 2009/2010

Two fold project: I pulled all of the galley cabinetry and relaminated the tops and at the same time added insulation to the ice box. The insulation was Dow Corning pink foam with ABS glued to the sides, I used silicone to attach the ABS. It was an easy project it just took some time to fabricate each of the panels and then to glue them in place. I also added the cold plate show in the photo and compressor in the cockpit locker on the small shelf. Its nice having refrigeration and not having to hassle with ice.

Counter tops laminated, teak doors replaced the black plexi glass in the galley and a saltwater pump.

I also replaced the laminate at the chart table and rewired the entire boat, pulling new wire and connecting up the new Blue Sea System electrical panels.
This winter has and is being used to get the boat ready for extended cruising and offshore racing. Projects have included:
* New 110 Amp Alternator
* New Battery Charger
* Wiring and fuses brought up ot ABYC standards
* Galley countertops laminated
* Ice box insualation increased
* Refrigeration
* Nav Station laminated
* Instruments flush mounted
* Emergency Battery for lights and Instruments with a seperate panel
* Engine Control Panel replaced and new wiring
* Engine Control Panel replaced and new wiring
* Replaced Fresh Water Pump
* Replaced Raw Water Pump
* New engine hoses
* Replaced and upgraded the Heat Exchanger
* Rebuilt and repaired the exhaust riser
* New Garhauer Rigid Boom Vang
* Harken MIV System 2 roller fuler with removable drum and dual tracks
* Navtec series 9 Integral Hydraulic Backstay Adjuster
* Insulated Backstay for future SSB installation
* Tracks reanodized and Harken captive ball bearing tracks added for adjustable genoa cars
* Main Sheet system redesigned for greater effieciency
* Cunningham
* Spinnaker Pole improvements
* Outhaul improved to a 12:1 purchase
New Sails:
* CAL #1
* CAL #3
* Spinnaker
Winter 2008 Projects

* Replaced all of the head hoses and fresh water hoses
Winter 2008 Projects


* Replaced all of the head hoses and fresh water hoses
* Replaced and upgraded all of the house wiring
* 7 coats of interior varnish
2008 Projects
* Cutlass bearing and shaft replaced, prop balanced.
* Thru hulls and valves all replaced with Bronze addition of sea strainer for cooling intake.
* Epoxy barrier coat
* Bottom paint
* Stanchions re-bed
* Rudder cap replaced
* Auto pilot replaced
* Minor cracks and dings repaired and gel-coated
* New Dodger
* Mast and boom painted
* New standing rigging
* New tricolor/strobe at the masthead along with a new VHF antenna
* New life lines
* Webasto 5000 cabin heater installed.
* New wiring throughout the boat and engine
* New AGM House Bank
* New AGM Start Battery
* New Running Rigging
2008 Mast Rebuild
 One of the first items we addressed was reworking of the mast. and the boom. All of the wiring was replaced, the mast and boom were painted and hardware was replaced as needed also the standing rigging was replaced.
No comments:
Post a Comment